How To Make A Dried Hydrangea Wreath (An Easy DIY)
Learn how to make a stunning dried hydrangea wreath with these simple steps!
If you love the look of a beautiful wreath on your front door that looks lovely through the fall and winter months, then a dried hydrangea wreath is a classic! Dried hydrangea blooms are perfect dried flowers to create a stunning DIY wreath.
While you are always welcome to use faux flowers, there are specific tips and tricks that really help when working with fresh flowers (or in our case, dried hydrangeas).
Let’s jump in and I’ll give you a simplified step-by-step tutorial for an easy dried hydrangea wreath- a perfect fall DIY project that utilizes those gorgeous summer blooms!
Dried Hydrangea Wreath DIY
Making your own dried hydrangea wreath is not as complicated as you might think. A gorgeous hydrangea wreath may look intimidating since it’s so lush and full and displays those clustered bunches of little blooms across the entire wreath, making it appear like a bigger project, but it is actually quite simple. In fact, this is one of the easiest fall decor DIY projects I’ve ever done!

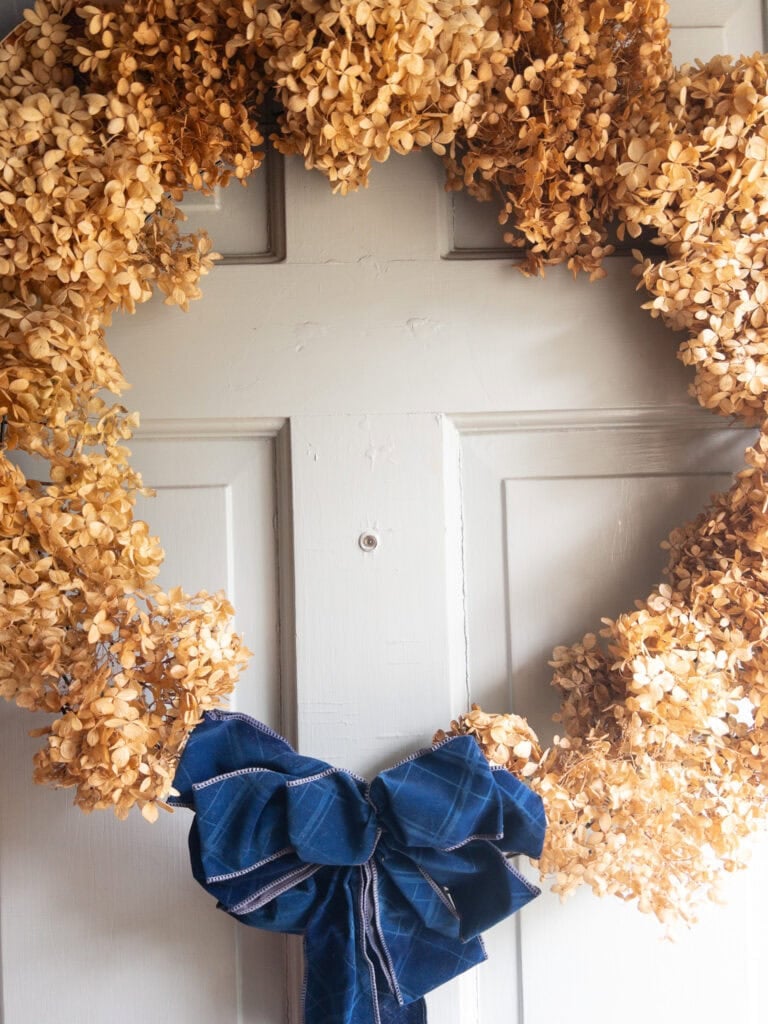
A dried hydrangea wreath looks gorgeous hanging from a front door- there’s something about that golden bloom color that looks so warm and inviting as it pops against a front door painted blue, green, black, or white. However, if you’re worried about it being a bit too delicate for the exterior front door, consider hanging it from an interior door, above your entryway console, or on the wall above your fireplace for a lovely home decor piece. Don’t forget to add a piece of ribbon or a stellar bow to really top it off!
Dried Hydrangea Wreath: Real Hydrangeas vs Faux Hydrangeas
When planning to make a hydrangea wreath, you have the option of using real hydrangeas of artificial hydrangeas as the star of the show. There are pros and cons to both!
If it were summer and you wanted to create a lush hydrangea wreath from pure white blooms, or maybe a vibrant pink or blue as the full color, you might have better luck by using faux stems.
However, if you are creating a dried hydrangea wreath to embrace the look of fall or winter, then using real dried hydrangeas are the winner as they have no extra cost, they provide a natural beautiful color, and they really do create the most beautiful wreath!
Pros To Using Faux Hydrangeas:
- Consistent color and shape
- May be a good option if you want a vibrant pink or blue hydrangea wreath (this is more of a summer wreath!)
- If you don’t have access to real hydrangeas
- If you love white hydrangeas and would like a pure white hydrangea wreath (also more of a summer wreath)
- Less delicate and won’t break as easily as real hydrangea stems
- May be on a bendable stem (which can be woven into the wreath form, allowing you to skip buying a plant tie for connecting to the form)
- If you don’t like the mess of little blossoms falling off of the hydrangea heads
- Can easily be stored inside during the off season (again, less delicate than a real hydrangea wreath)
- Can be weather resistant- or at least safer from outdoor elements
- Can be easily found on Amazon or in craft stores
- Won’t “shed” blossoms while hanging on the door
Cons To Using Faux Hydrangeas:
- Costs more than using hydrangea blooms from your own garden!
- The blooms may look fake
- May not have that natural “dried hydrangea” look
- Since dried hydrangea wreaths typically don’t use leaves (especially if you’re going for the brown, fully dried look that’s perfect for fall / winter), you may have to manually remove all of the faux leaves
- Doesn’t give you the satisfaction of using blooms from your own garden (and touching real flowers is so good for the soul!)
Pros To Using Real Hydrangeas:
- They are natural and beautiful!
- No extra costs for the actual flowers (and they create such a beautiful fall wreath for so cheap!)
- Eco friendlier option
- A way to use favorite flowers at the end of the season
- Touching real flowers is good for the soul!
- A way to continue “gardening” as the main gardening seasons come to a close
- Dried hydrangeas have a natural look that may be hard to create in a faux stem
- You can create many wreaths (or even sell them!) if you have numerous hydrangea shrubs growing in your garden
- An excuse to grow more hydrangeas!
- A classic fall home decor piece
- Can label the back of the wreath with a sentimental note “Dried Annabelle Hydrangeas From My 2025 Summer Garden” (what a great way to create something sentimental from the garden!)
- Instead of pruning the blooms and tossing in a yard waste bag, the blooms are upcycled into something beautiful!
Cons To Using Real Hydrangeas:
- Dry hydrangeas are very delicate- blossoms may fall off a bit and thin stems may break while trying to attach it to the wreath form
- You have to plan a bit more- cutting at the right time of the season, having access to hydrangeas, etc.
- Drying hydrangeas takes more steps to prepare (if they aren’t dormant already)
- You might have to be out in the garden when the weather is chilly if you’re cutting dormant blooms (blooms that are already that lovely golden-brown color)
- Flower blossoms might fall off while the dried hydrangea wreath is hanging on the door (especially if it is getting opened numerous times per day)
- Not weather resistant! In fact, it’s very important you protect a dried hydrangea wreath from the elements, as it can be easily ruined (if you are using fully dried and brown hydrangea blooms, direct sunlight should be okay)
- Harder to attach to a wreath form than faux flowers
Which Hydrangeas Are Best For A Dried Hydrangea Wreath DIY
The most popular varieties of hydrangeas for making a DIY dried hydrangea wreath are the Annabelle hydrangea (or Incrediball hydrangea– the newer and improved version of Annabelle hydrangeas, with typically larger blooms), and the classic Limelight hydrangea.
Annabelle hydrangeas and Incrediball hydrangeas have a fully rounded shape, whereas the Limelight hydrangeas have more of a cone-shape. Both shapes dry beautifully, and they can even be paired together on the same dried hydrangea wreath (like I did here!).

When considering which type of hydrangeas to use when making your own hydrangea wreath, make sure the blooms appear “full”. For example, a Tardiva hydrangea (while stunning) has very delicate blooms spaced farther apart, so this would make making a dried hydrangea wreath a bit trickier, or you would have to use many more dried blooms for coverage of bare spots (but it can still absolutely be done!).
Here are a few more beautiful hydrangeas that work well for making your own wreath: Bobo hydrangea, Endless Summer hydrangea, Gatsby Moon hydrangea, and so many more!
How To Dry Hydrangea Blooms
While you can cut and dry any type of hydrangea bloom, whichever color the bloom is when you cut it, that is what the color will be when it is dry (just not as vibrant in color). That is something to keep in mind because some hydrangeas change colors throughout the season. And many hydrangeas keep changing color by late summer or early fall.
For example, Limelight hydrangeas will change to a chartreuse color and a pink color before the hydrangea plant goes dormant for winter and the blooms are fully dried out and brown. So if you prefer those beautiful hydrangea blossoms to have a touch of green or pink, you’ll have to monitor your hydrangea bushes to know the right time to do your cutting.
If you are going to be cutting your own hydrangea flowers, be sure to cut blooms that are fully open. What happens if you cut blooms with buds that are still a bit closed, is that the blooms will wilt. You can cut the hydrangea stems however long you’d like, but be sure to always cut right above a node or where the leaf actually meets the stem- as this protects the plant and encourages blooms for next year (especially if you’re working with a panicle hydrangea such as a limelight).
I highly recommend keeping about 4-6 inches of stem, as it makes this specific dried hydrangea wreath DIY much easier to work with- a long stem is better than too short of a stem here! (If you don’t have any flower stems, it’s much more difficult to attach the flower to the wreath form).

After cutting the stems, fill a vase (or mason jars) with about an inch of water and set aside. Remove all of the leaves from the cut hydrangeas. Make an angled cut between 2 nodes (this allows the hydrangea to pull in more water). Place the hydrangeas in the vase, and store inside out of direct sunlight. (Do not add any more water during this time). This water method will take 2-3 weeks to dry, and the hydrangeas will be ready to use!
However, if you wait until the cooler months, typically around early November (at least in our zone 6a), this time of year is already doing the “drying” process for you. As the plant goes dormant for winter, the hydrangea flower heads turn a warm brown that truly looks lovely.
In fact, many gardeners love leaving these dried blooms in the garden through the winter because they provide winter interest in the garden. Sure, you would be missing out on having a “fall wreath”, but if you’re doing some planning ahead for next year, it’s smart to collect the dried hydrangea blooms during the winter, store in the garage or basement, and then use those blooms from last year to create a wreath in late August or early September so your dried hydrangea wreath is ready to go at the start of the fall season! (That’s what I did for mine!).

How To Make A Dried Hydrangea Wreath
**See section above for notes on how to dry hydrangea blooms!
While you can make your own grapevine wreath out of twigs, and use a hot glue gun to attach the blooms (if you prefer to use mostly all natural materials), I’m going to show you how to make a DIY dried hydrangea wreath with a wire wreath form and wire plant ties (which makes it easy to connect the blooms to the wreath wire!).

As you can see, dried hydrangeas are very delicate and their dried petals tend to fall off easily. Consider this when starting your DIY hydrangea wreath project, because you’ll need to set up in an area that you don’t mind “sweeping” at the end. I suggest keeping the blooms in a large opened box (I used a large Nordstrom box and it fit the blooms perfectly inside) to contain the mess.

Items used for the Dried Hydrangea Wreath DIY project:
- Dried hydrangea blooms (I used about 13, but it depends on how large your flower heads are) **Note: keep about 3-6 inches of stem if possible
- 24″ wire wreath frame (buy the exact one HERE; *The 24″ makes a stunning large wreath for the front door!)
- Plant ties (* I use these because they are easy to work with and twist around the hydrangea stem, so I don’t need to make a knot or a bow, just a simple twist! Other options for tying are: bread ties, florist wire, stretchy plant ties, floral wire, fishing line, or any piece of wire or string that can easily hook around a stem- you could even try a paper clip or tape!)
- Wire cutters or sharp scissors if using wire plant ties (sharp scissors works for my plant ties)
- Door wreath hanger (or command hook / outdoor adhesive hook)
- Large velvet bow or ribbon (*I found mine at a local garden shop, but you can find similar styles HERE, HERE, or pretty holiday ribbon HERE; Amazon sells a hair bow that could also be clipped on the wreath HERE)

I mean, how fabulous does this big blue velvet bow look against those dried blooms?!
DIY Dried Hydrangea Wreath Steps:

Once you have the dried hydrangeas ready to go, the first thing you’ll want to do is to simply lay the dried hydrangeas over the wire wreath frame to get a feel for how many dried blooms you’ll need.

By placing the dried hydrangea blooms around the wreath frame, you’ll get a sense of the hopeful look you’re trying to achieve. Some dried hydrangea flowers may be a bit darker tan while others a bit lighter, so spacing them out is helpful to avoid one big cluster of a darker color.

Above, you can see the difference in color between the lighter and darker shades of tan / brown- and yet they look lovely together!

You will also get a sense of the “fullness” of blooms in different areas of the wreath. Some dried blooms will be larger and denser with petals, while others might be a bit more airy. Playing around with the placement of the dried hydrangea blooms before attaching it to the wreath form will give you the best idea of what the end result will look like.


If you’re planning to use a bow or ribbon, I suggest playing around with it to see how you would like to attach it, depending on the look that you like. You can either attach it directly to the wire frame with string or wire, or you can attach it by hooking in on to the actual hydrangea blooms as seen above. (I ultimately chose to attach it directly to the wire frame as seen below!).


Next step- cut the plant wire into about a 3 inch piece. I was able to use sharp scissors, but depending on how thick your plant wire is, you might need to use wire cutters.

Slide the hydrangea stems through the top of the wreath frame through one of the openings.

Loop the plant wire gently around the hydrangea stem and the wreath wire. Remember to be gentle because those dried stems are also very delicate!

Gently twist the plant tie to secure. (If you chose to use a string instead, you’ll have to gently tie a knot around it).

Position the next dried hydrangea bloom close to the previously secured bloom.

Secure another 2-3 inch plant tie around the stem of the next dried hydrangea bloom. Repeat this all the way around the wreath frame, leaving space for a ribbon / bow, if you choose to attach it directly to the wreath frame.

If you have smaller hydrangea blooms that have broken off of the larger hydrangea heads, you can use them to “fill in” bare spaces along the wreath.

The underside of the wreath should look something like this:

If the hydrangea stems are too long on the underside of the wreath, you can weave them in through the frame wires, or cut the access stem with scissors.

Lastly, secure a big beautiful bow to your wreath frame (mine came with a thin wire for attaching)- and you have yourself a gorgeous dried hydrangea wreath!

One final tip- be sure to collect extra dried hydrangea leaves from the garden (or dry extras if you’re doing the hydrangea drying process), because you might tie them closer together than you think. I barely had enough to cover the 24 inch wreath form!

This makes the most beautiful fall wreath (and winter wreath!). Now go hang it on your front door (if it’s a covered entryway- remember this is a delicate wreath!), and enjoy through the fall and winter seasons!
I told you it was an easy DIY for stunning fall decor 😉 Enjoy!
You’ll Also Love:
Hand Painted Pumpkins: An Easy Fall DIY
How To Create A Beautiful Coastal Thanksgiving Tablescape
Hanging Witch Hats And Floating Candles For Halloween
Gardener Christmas Ornaments For A Garden Themed Christmas Tree